
Find a Worcester Bosch Boiler Engineer Near Reading Berkshire
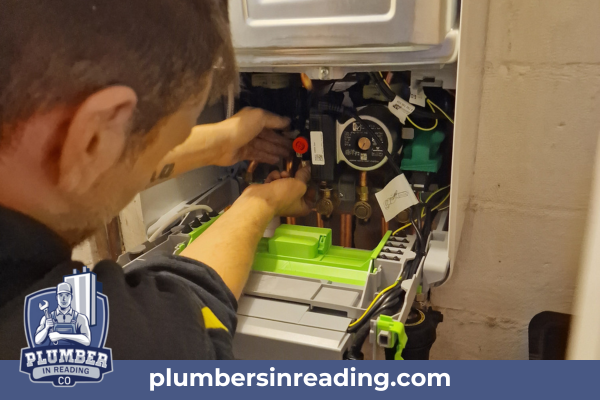
Finding a reliable Worcester Bosch boiler engineer near Reading, Berkshire, is crucial for homeowners. Many people begin by searching online for “worcester bosch boiler engineer near Reading Berkshire” to locate trusted specialists. Worcester Bosch boilers are known for their efficiency and reliability. Regular maintenance ensures they perform optimally and last longer, especially when you book a Worcester Bosch service at recommended intervals. A certified Worcester Bosch engineer can provide quality service, adhering to manufacturer standards. This includes annual inspections, cleaning, and necessary part replacements. Many local providers also offer a comprehensive Worcester boiler service to keep systems safe and efficient. Boiler maintenance in Reading involves checking for leaks, pressure levels, and overall system efficiency. It helps prevent unexpected breakdowns and costly repairs. For comprehensive boiler maintenance Reading households can trust, schedule annual check-ups with a qualified professional. Plumbers in Reading offer a range of services, including installation, repair, and maintenance. They ensure your boiler complies with local regulations and safety standards. That includes boiler installation Reading projects as well as urgent boiler repair Reading callouts when problems arise. Using resources like Plumbers in Reading can help you find qualified professionals for routine servicing and repairs. This ensures your Worcester Bosch boiler receives the best care possible and helps maintain warranty validity. Why Choose a Worcester Bosch Boiler Engineer in Reading, Berkshire? Choosing a Worcester Bosch boiler engineer in Reading, Berkshire, ensures you receive expert service. These engineers are trained to handle Worcester Bosch boilers specifically. Their training guarantees adherence to the manufacturer’s standards and specifications, especially during a dedicated Worcester Bosch service. Certified engineers have access to original parts directly from Worcester Bosch. This access ensures your boiler remains compatible and under warranty. It also minimises the risk of issues arising from non-compliant parts. Worcester Bosch engineers are equipped to troubleshoot efficiently. They can pinpoint problems swiftly, reducing downtime and inconvenience. This expertise saves you both time and potential additional costs. Selecting a local engineer offers added convenience. They are familiar with Berkshire’s specific weather patterns, affecting boiler performance. This understanding aids in providing tailored advice and services. Additionally, local engineers benefit from a strong community reputation. You can easily check their reviews and ratings from previous customers. This transparency offers peace of mind in your choice. Comprehensive Worcester Bosch Boiler Services Available Worcester Bosch boilers are renowned for their efficiency and reliability. These qualities are sustained through comprehensive services available in Reading. Regular servicing keeps boilers performing optimally, ensuring home comfort. When needed, book a Worcester Bosch service or a full Worcester boiler service package for thorough care. Services offered range from routine maintenance to complex repairs. Annual inspections are key, where professionals assess boilers for common issues. This proactive approach helps in identifying potential problems early. Complete boiler services include cleaning and part replacement. Engineers check the flue and ventilation systems to ensure safety compliance. These measures prevent gas leaks or carbon monoxide emissions, ensuring peace of mind. Offering more than basic check-ups, some service packages include energy efficiency assessments. This helps homeowners manage energy consumption, resulting in cost savings over time. Access to thorough servicing enhances the lifespan of your Worcester Bosch boiler. Investing in these services reduces the risk of unexpected breakdowns. Importance of Regular Boiler Maintenance in Reading Maintaining your boiler regularly is essential for optimal performance. Scheduled check-ups help detect small issues before they escalate into costly repairs. This proactive approach can save homeowners both time and money. For dependable boiler maintenance Reading residents can rely on, arrange a yearly service with a trusted local specialist. In Reading, cold winters demand efficient heating systems. A well-maintained boiler ensures consistent warmth. Regular maintenance prevents unexpected breakdowns during critical times, providing reliable home heating. Safety is another crucial reason for regular boiler maintenance. Engineers check for potential hazards such as gas leaks and carbon monoxide emissions. Early detection of these issues is vital for household safety. Additionally, a serviced boiler operates more efficiently, reducing energy bills and promoting environmental conservation. Regular care not only extends the lifespan of the boiler but also contributes to a lower carbon footprint. Signs You Need Boiler Repair or Replacement Recognising the signs of a failing boiler can help you act promptly. Early intervention can prevent a complete system breakdown. Strange noises such as banging or whistling often indicate underlying issues. These sounds can signal parts that may need repair or replacement. If your boiler frequently loses pressure, it’s a sign of a potential leak or a broken component. Pressure should be stable for efficient operation. Uneven heating throughout your home can also indicate a malfunction. Cold spots suggest your boiler is struggling to distribute heat effectively. For urgent boiler repair Reading homeowners can trust, contact a qualified local professional to assess the system quickly. These issues emphasise the importance of professional assessment. Whether it’s repair or replacement, expert advice is crucial to ensure safety and efficiency. How to Find a Certified Worcester Bosch Engineer Near You Finding a certified Worcester Bosch engineer ensures top-quality service. Look for credentials and certifications that confirm their expertise. Start by checking official Worcester Bosch websites or directories for registered engineers. These platforms often provide a list of qualified professionals in your area. You can also seek recommendations from friends or family who have previously used boiler services. Personal experiences can guide you in selecting a reliable engineer. Reviews and ratings on online platforms are valuable. They offer insights into service quality and customer satisfaction. A certified engineer knows how to handle specific boiler models. Their training ensures they follow the correct repair and maintenance protocols, giving you peace of mind. For local convenience, platforms like plumberinreading.com make it easy to compare options. Why Use plumberinreading.com for Your Boiler Needs? Choosing Plumber In Reading makes finding expert boiler services straightforward. This platform connects you directly with local professionals. Whether it’s installation, repair, or regular maintenance, you’ll find trusted service providers, including boiler installation Reading specialists. The site offers easy navigation to view services and
Gas Water Heater Installation in Reading
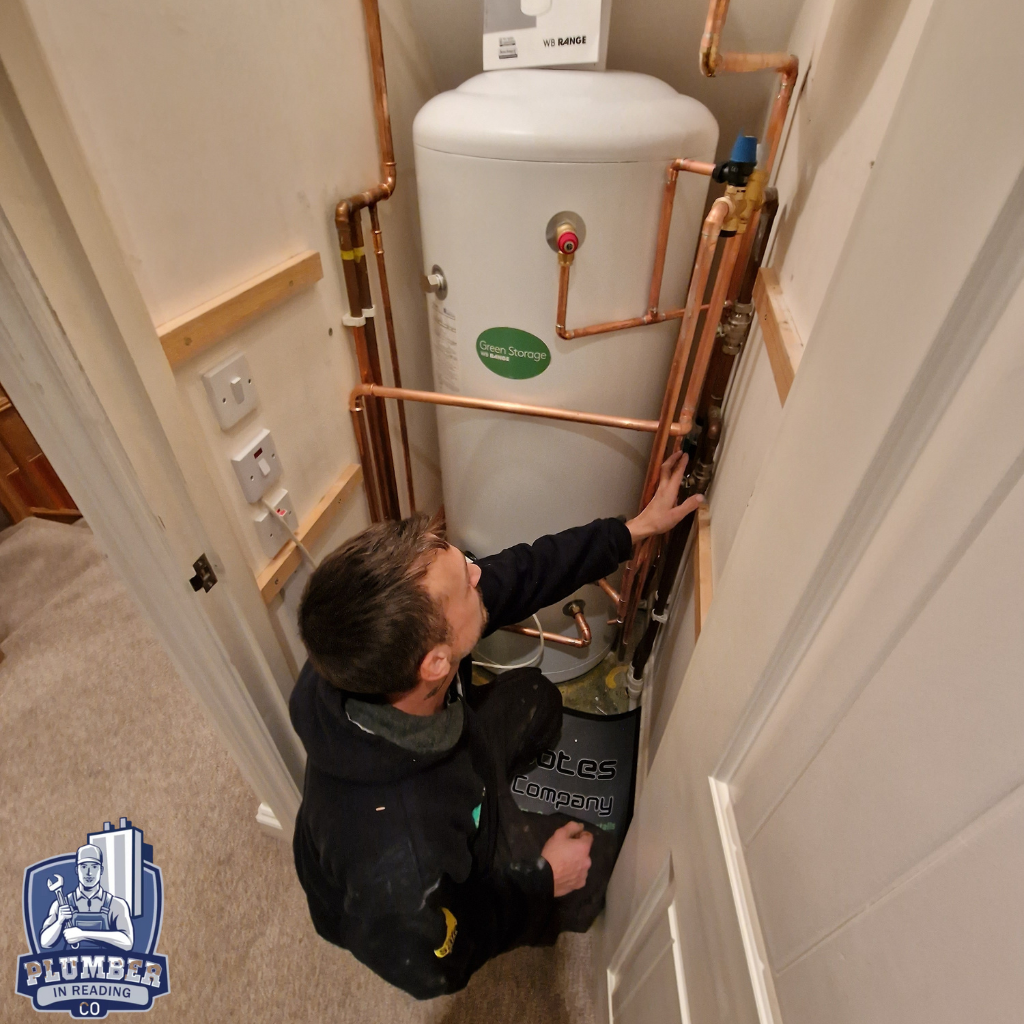
The installation of a gas water heater is a critical task that requires precision and expertise. Proper installation not only ensures optimal performance but also guarantees safety. The complexity of this process involves multiple steps, each requiring specific skills and an understanding of both mechanical and safety protocols. When it comes to gas water heater installation in Reading, engaging a professional service like Plumber in Reading LTD can make all the difference. This water heater guide explores the intricacies of water heater setup, broader gas appliance installation practices, and provides practical installation tips to ensure a seamless and safe process with support from local gas installers. The installation of a gas water heater involves several steps that require careful attention to detail. It is imperative to understand the entire process to appreciate the value of professional intervention. A typical installation involves gas appliance setup, connecting it to the gas supply, and ensuring proper ventilation. These steps are crucial to preventing any potential hazards and to ensuring that the heater operates efficiently. Each step requires precision and a deep understanding of the system’s requirements to avoid future issues. Moreover, the installation process is heavily regulated by safety standards and local building regulations, which means that compliance is not optional but mandatory. Incorrect installation can lead to serious safety risks, including gas leaks and potential carbon monoxide poisoning. Therefore, the role of a skilled professional cannot be overstated, as they bring both expertise and an understanding of these critical safety considerations. The Importance of Professional Installation While some homeowners may be tempted to undertake the installation themselves, the complexities involved often necessitate the expertise of a professional. As a leading name in Reading plumbing services, Plumber in Reading LTD offers experienced technicians who understand the nuances of gas appliance setup and gas appliance installation. Their expertise ensures that all safety protocols are adhered to, minimising the risk of gas leaks and other potential dangers. Furthermore, professional installation often includes warranties that protect your investment, giving you peace of mind. In addition to safety, professional installers bring efficiency and reliability to the table. They have access to specialised tools and equipment that may not be available to the average homeowner. This ensures not only a proper installation but also one that is performed swiftly and with minimal disruption to your daily routine. In the long run, hiring a professional can save you time, money, and stress. Safety Considerations Installing a gas water heater is not just about connecting pipes and wires; safe gas heater installation also involves a thorough understanding of gas flow dynamics and ventilation requirements. The team at Plumber in Reading LTD is well-versed in these aspects, ensuring that every installation complies with local regulations and safety standards. They are trained to identify potential hazards and take corrective actions before they become issues. Safety considerations also involve ensuring that the correct materials and components are used during the installation. Using substandard materials can lead to premature failure of the system or even hazardous situations. The professionals at Plumber in Reading LTD use only high-quality parts and adhere to strict guidelines to ensure the safety and durability of your water heater installation. Steps Involved in Gas Water Heater Installation Site Preparation Before the actual installation begins, it is essential to prepare the site where the home water heater will be installed. This includes ensuring adequate space for the unit and sufficient ventilation. The area should be free from combustible materials and should have a stable floor to support the weight of the heater. Proper site preparation is critical not only for safety but also for the efficient operation of the heater. Additionally, site preparation may involve making modifications to the space to accommodate the new unit, such as installing a new gas pipe or expanding the existing ventilation system. This phase may require coordination with other contractors, especially if structural changes are necessary. Having a professional handle this ensures that all aspects of the preparation meet the necessary standards and requirements. Positioning the Heater Once the site is prepared, the next step is to position the heater. This involves placing the heater in a manner that allows for easy access to the gas and water connections. Correct positioning is crucial for maintenance and in case of any repairs. It also ensures that the heater operates efficiently, as incorrect placement can hinder its performance. Positioning also involves considerations for future maintenance and potential repairs, ensuring that the unit is easily accessible for servicing. The installation team will ensure that the heater is positioned in accordance with the manufacturer’s recommendations and local building regulations, which helps in prolonging the lifespan of the appliance. Connecting the Water Supply Connecting the water supply involves attaching the inlet and outlet pipes to the heater. This step requires precision to prevent leaks. The technicians at Plumber in Reading LTD use high-quality materials and fittings to ensure a secure connection. Proper water supply connection is crucial to avoid water damage and to ensure the efficient operation of the heater. Moreover, the professionals will also check the water pressure and ensure that it is within the recommended range for the heater model being installed. This step is vital, as incorrect pressure can lead to operational issues and reduce the lifespan of the appliance. Regular inspections and maintenance can help in identifying potential problems early on. Gas Supply Connection The gas supply connection is one of the most critical aspects of the installation. It requires a thorough understanding of gas lines and pressure requirements. A secure connection is vital to prevent gas leaks and ensure efficient operation. The professionals at Plumber in Reading LTD are trained to handle these connections with the utmost care. They will also conduct pressure tests to confirm that the connections are secure. Additionally, the installation team will ensure that the gas supply is compatible with the heater model and that all connections adhere to local safety regulations. This step is essential not only for safety
How to Reset Vaillant Boiler
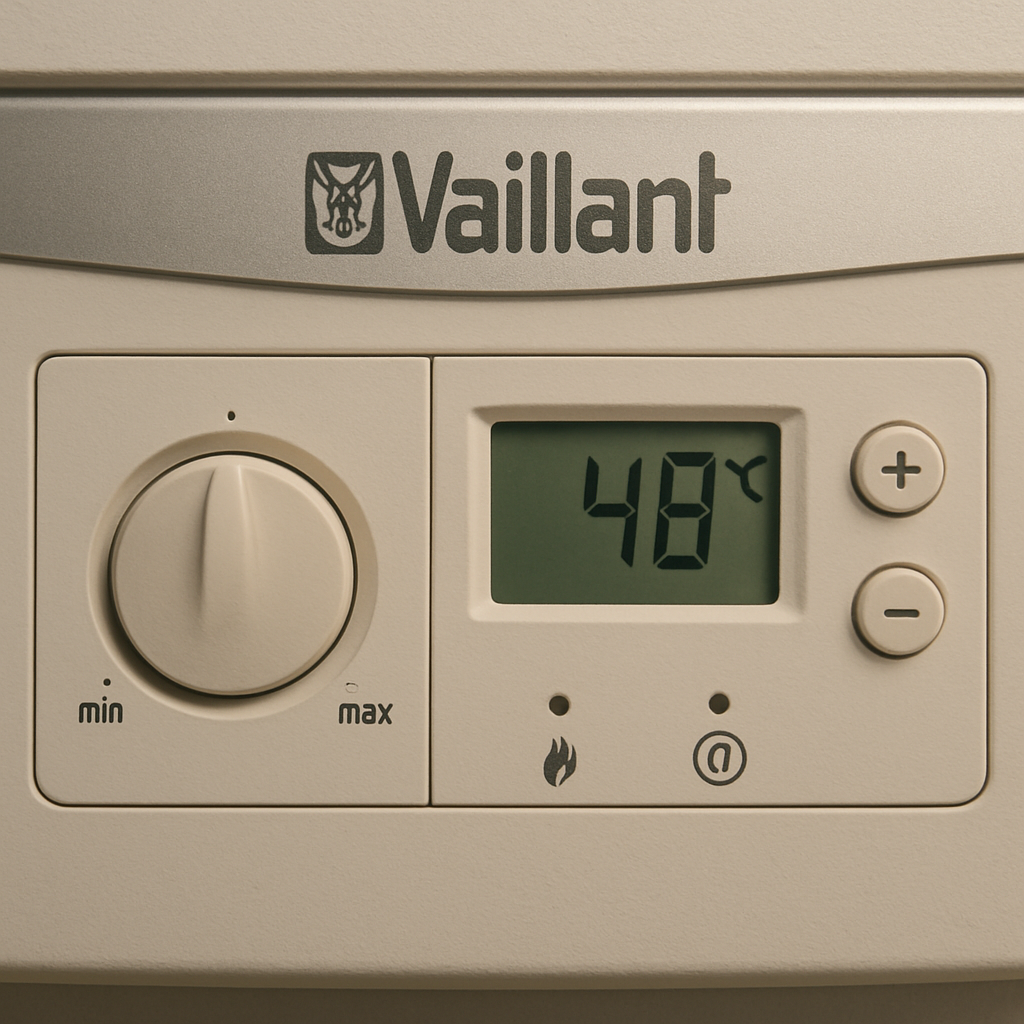
A Vaillant boiler is a reliable choice for home heating. However, like any appliance, it may need a reset. If you’re searching for how to reset vaillant boiler steps, this guide will help. Resetting your Vaillant boiler can resolve minor issues. It’s a simple process that can restore normal function. Sometimes a quick Vaillant boiler reset is all that’s needed after a power cut or when resetting heating system components. This guide will walk you through the steps to reset various Vaillant models, including how to reset a Vaillant EcoTec Pro 28 boiler, how to reset a Vaillant EcoTec Plus 28 boiler, how to reset a Vaillant EcoTec Plus 831 boiler, and how to reset a Vaillant EcoTec Plus 418 boiler. We’ll cover common issues and troubleshooting tips. Understanding when and why to reset is crucial. It can prevent unnecessary repairs and ensure your boiler runs smoothly. Whether you’re looking for Vaillant boiler help or quick Vaillant boiler troubleshooting, the steps below will keep things simple. Safety is a priority when handling boiler resets. Always follow the recommended precautions to avoid accidents. Let’s dive into the details of resetting your Vaillant boiler. This will help you maintain comfort and efficiency in your home. Understanding When and Why to Reset Your Vaillant Boiler Resetting your Vaillant boiler can sometimes be necessary. It can address power cuts or system errors. Occasionally, a routine service may also require a reset, especially after resetting Vaillant boiler controls during maintenance. You might wonder when a reset is needed. Common signs include lack of heating or hot water. An error code on the display is another indicator. It’s important to understand the purpose of resetting. A reset clears minor faults. It’s not a solution for major mechanical failures. Regular maintenance can reduce the need for resets. Here are situations where a reset might be required: Understanding these situations can save time and effort. It can also help you avoid unnecessary stress. Safety Precautions Before Resetting Before resetting your boiler, safety is key. Ensure the area is clear and well-ventilated. Being cautious can prevent accidents. Always switch off the power supply first. This prevents electrical shocks or further damage. Handle the boiler components carefully. Consider these safety measures: These simple steps can protect both you and your boiler. Safety precautions help avoid costly mistakes and ensure a smooth reset process. Locating the Reset Button on Different Vaillant Models Finding the reset button on a Vaillant boiler is essential for troubleshooting. Different models may have slight variations in button placement. Knowing where to look can save time and frustration. Typically, the reset button is on the boiler’s control panel. It’s often marked with a flame symbol and a line through it. This icon helps users quickly identify the reset function. For Plus models, if you need guidance on how to reset a Vaillant EcoTec Plus boiler, the reset control is commonly just below the display. Here’s a quick guide to locate the reset button on common models: Consult your boiler’s manual for specific instructions. Having this information readily available can assist with efficient troubleshooting. Familiarity with the control panel ensures a smooth reset process. Step-by-Step Guide: How to Reset a Vaillant Boiler Resetting your Vaillant boiler may seem daunting, but it’s a straightforward process with the right guidance. This step-by-step approach will simplify the task and applies broadly if you’re learning how to reset vaillant boiler controls across similar models. Firstly, ensure safety by switching off the boiler. Allow it to sit idle for a few minutes to cool down. Safety is crucial before any reset action. Next, locate the reset button on the control panel. Refer to your user manual for precise details. The reset button often has a distinctive symbol. Press the reset button firmly. Hold it for at least five seconds to initiate the reset. Release it once you see the display change. Observe the boiler’s display for any error codes. If there are none, the reset was successful. Your boiler should now return to normal operation. If error codes persist, consult your manual. Identify the specific issue and address it before another reset. This can prevent potential damage. During the reset process, keep a lookout for unusual sounds or alerts. A diagram of a boiler panel can help identify parts and support quick Vaillant boiler troubleshooting. How to Reset a Vaillant EcoTec Pro 28 Boiler The EcoTec Pro 28 model has a simple reset process. Begin by ensuring the boiler is turned off. Safety is always the first step. Reset Instructions: This model features a reset button conveniently located on the panel. Ensure all prerequisites are met to ensure a successful reset. These steps are ideal if you specifically searched for how to reset a Vaillant EcoTec Pro 28 boiler. How to Reset a Vaillant EcoTec Plus 28 Boiler Resetting an EcoTec Plus 28 boiler involves a few easy steps. Begin by switching the boiler off to ensure safety during the process. Reset Instructions: This is typically enough to clear minor faults. Afterwards, check the display to ensure normal operation resumes without any error alerts. This also covers how to reset a Vaillant EcoTec Plus boiler in many common scenarios. How to Reset a Vaillant EcoTec Plus 831 Boiler For the EcoTec Plus 831, resetting is straightforward. Ensure the boiler is off to start with a clean slate and avoid risks. Reset Instructions: These steps match how to reset a Vaillant EcoTec Plus 831 boiler in most households. How to Reset a Vaillant EcoTec Plus 418 Boiler Resetting an EcoTec Plus 418 follows similar steps. Safety is key, so always begin with switching the system off. Reset Instructions: Check for stability and error messages on the display after resetting. A successful reset should lead to normal operational status. These directions align with how to reset a Vaillant EcoTec Plus 418 boiler. Common Error Codes and Troubleshooting Tips Understanding common error codes can assist in troubleshooting your Vaillant boiler. These codes indicate specific issues
What Metal is Used for Pipes in Plumbing in Houses
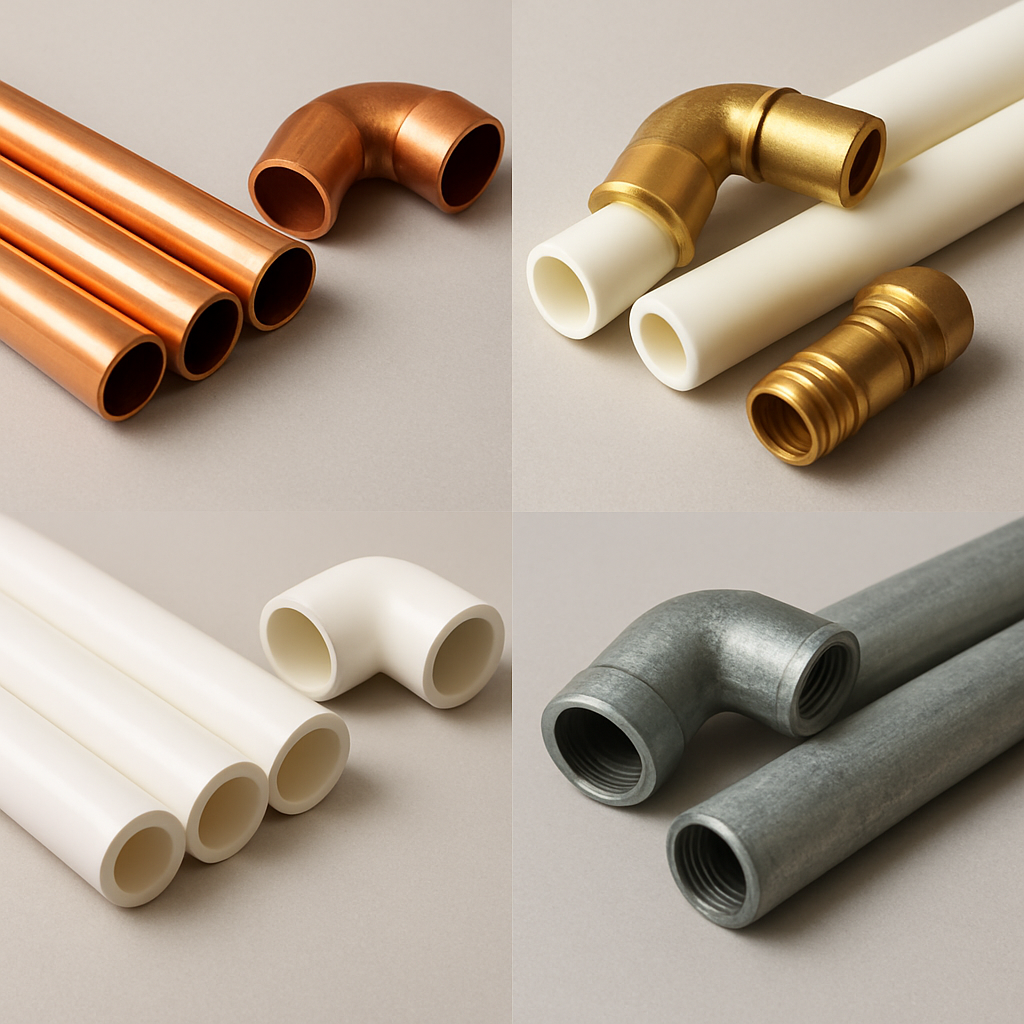
Choosing the right plumbing pipes is crucial for a home’s plumbing system. Different metals offer unique benefits and drawbacks. Copper, galvanised steel, brass, and stainless steel are common choices. Each has its own set of advantages and disadvantages. Understanding these materials helps in making informed decisions. Homeowners and professionals alike benefit from knowing the best options. This guide explores the metals used in residential plumbing. It provides insights into their applications and suitability. By the end, you’ll have a clearer understanding of plumbing pipe materials. This knowledge aids in selecting the best fit for your needs. Overview of Plumbing Pipe Materials Plumbing systems rely on a variety of materials, each chosen for specific properties. Metal pipes are preferred for their strength and durability. Traditionally, several metals have been utilised in plumbing. Copper, galvanised steel, brass, and stainless steel remain popular choices. Each offers unique benefits, making them suitable for different plumbing requirements. Modern plumbing also includes non-metal options. PEX, PVC, and CPVC pipes provide flexible and cost-effective alternatives to metal. They are often chosen for ease of installation and affordability. When deciding on plumbing materials, consider factors like longevity, cost, and application. Here’s a brief list of common metal plumbing pipes: Balancing these considerations ensures a reliable and efficient plumbing system. Copper Pipes: The Gold Standard in Residential Plumbing Copper pipes have been a staple in residential plumbing for decades. Their impressive strength and reliability have made them a top choice. Homeowners favour copper for its excellent corrosion resistance. Input (British English): This metal doesn’t rust easily, ensuring longevity and safety in water supply lines. Additionally, copper is known for its heat tolerance. It’s ideal for both hot and cold water pipes, providing versatility and consistent performance. While copper pipes can be more expensive than alternatives, their durability justifies the investment. Their long-term benefits often outweigh the initial costs. Here are key features that make copper pipes a top choice: Ultimately, copper stands out as a reliable material for residential plumbing, providing peace of mind in any plumbing system. Types of Copper Pipes: Rigid vs. Flexible Copper pipes are available in two primary forms: rigid and flexible. Each type has specific uses and advantages. Rigid copper pipes are sturdy and often used for new water lines. Their strength ensures long-lasting, stable installations. Flexible copper pipes are used in tight spaces. Their bendability allows them to navigate around obstacles. Here’s a quick comparison: Both types serve critical roles in modern plumbing systems, accommodating diverse installation scenarios. Advantages and Disadvantages of Copper Pipes Copper pipes offer numerous advantages. Their resistance to corrosion and high temperatures makes them highly reliable. Another plus is copper’s recyclable nature. This supports environmentally friendly practices in plumbing installations. However, copper pipes can be pricey. They sometimes cost more than alternative materials like PEX or PVC. Here’s a summary of the pros and cons: Advantages: Disadvantages: Choosing copper involves weighing these factors to align with your plumbing needs and budget. Galvanised Steel Pipes: Once Common, Now Rare Galvanised steel pipes were a popular choice in homes from the early 20th century. They offered an affordable solution and were widely installed in residential plumbing systems. These pipes have a zinc coating designed to prevent rust. However, over the years, they’ve become less desirable due to several drawbacks. Modern homeowners and plumbers often avoid galvanised steel. Issues like rust, mineral build-up, and water discolouration are common concerns. Here’s why they have fallen out of favour: With these limitations, newer piping materials are now preferred in home plumbing systems. Issues with Galvanised Steel Pipes Galvanised steel pipes face several significant issues. Their zinc coating can deteriorate, leading to rust and corrosion. Water quality is often a concern, as these pipes can release particles. These particles may discolour water and affect taste. Key problems include: Overall, understanding these issues helps in making informed decisions about plumbing upgrades. Brass Pipes: Durable and Reliable Brass pipes stand out for their durability and superior rust resistance. They are often preferred in plumbing systems that require longevity. One of the key benefits of brass is its ability to withstand high water pressure. This makes it an excellent option for main water lines. Brass also offers a long service life, often outlasting other materials. It’s known for being easy to work with and having a reduced risk of leaks. Benefits of brass pipes include: Homeowners value brass for both its aesthetic appeal and its functional reliability, ensuring a stable plumbing system. Stainless Steel Pipes: Modern and Resilient Stainless steel pipes are known for their sleek appearance and strength. They’re often used in areas exposed to harsh conditions due to their remarkable corrosion resistance. Stainless steel is particularly favoured where aesthetics and performance converge. Key characteristics of stainless steel pipes include: While more costly than other materials, their resilience offers peace of mind. This makes them a valuable investment in high-quality plumbing solutions. Lead Pipes: A Hazard of the Past Lead pipes were once popular in plumbing systems due to their pliability and ease of use. However, they posed significant health risks linked to lead exposure. Consequently, their use is now banned. Important facts about lead pipes include: Non-Metal Alternatives: PEX, PVC, and CPVC Non-metal pipes have gained popularity for their versatility and cost-effectiveness. One of the top choices is PEX, a flexible plastic pipe ideal for retrofits and tight spaces. Its ease of installation and resistance to limescale make it a favourite among homeowners. PVC, commonly used for waste pipes, is lightweight and affordable. It’s ideal for non-pressurised applications and stands out for its durability. CPVC shares similar features with PVC but has enhanced thermal resistance, making it suitable for hot water pipes. Non-metal plumbing options include: Comparing Metal and Non-Metal Plumbing Pipes Choosing between metal and non-metal pipes depends on several factors. Metals like copper and stainless steel offer robust durability and longevity. Non-metals such as PEX, PVC, and CPVC provide flexibility and a lower price point, appealing to budget-conscious buyers. Each type has its
How Long Does It Take to Fit a New Boiler?
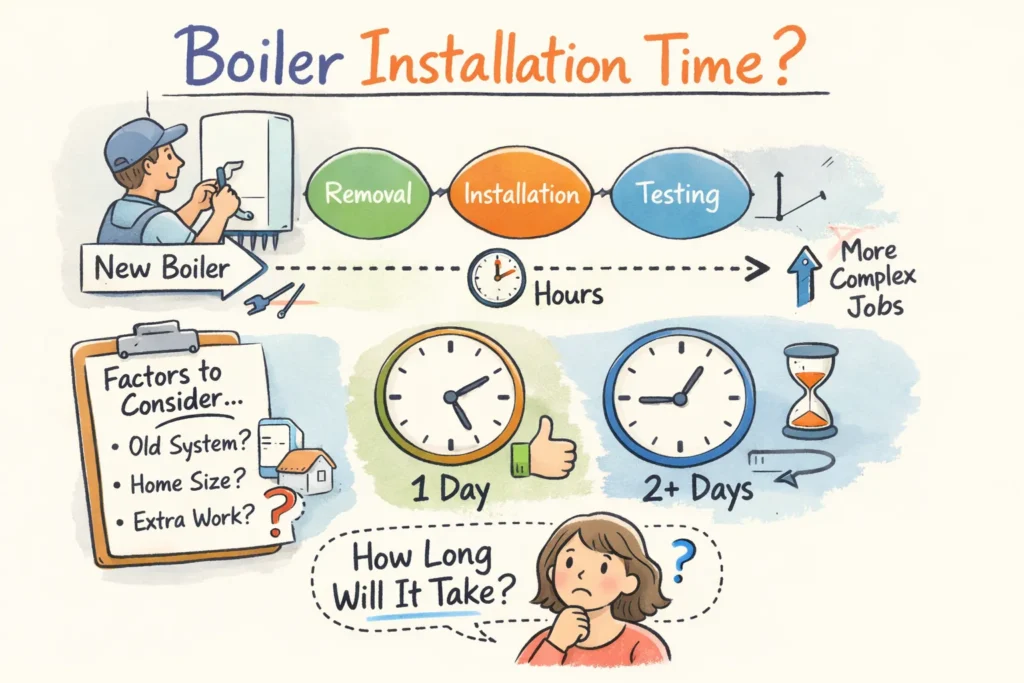
How long does it take to fit a new boiler? For a straightforward like-for-like combi swap plan on about 4–6 hours on the install day. If the job involves a system boiler and a hot-water cylinder, expect roughly 2–4 days. Read on for a clear breakdown of the survey, installation and common add-ons so you know what to expect at each stage. What you need to know Site survey and scheduling: what sets the timescale A site survey determines the scope and sets a realistic timetable. A qualified Gas Safe engineer typically spends 45–90 minutes inspecting flue options, condensate runs, space for the new boiler, pipework layout, electrical supply and the number of radiators. They also look for hidden complications, such as corroded fittings or inaccessible isolation valves. The survey produces a written quote that lists required parts, lead times and proposed install dates. That quote shows whether the job will be a straightforward same-for-same swap or a more complex relocation requiring extra time. With the scope confirmed we can estimate times precisely: combi swaps usually finish in 4–6 hours, while system boilers and relocation work can take several days depending on pipework and cylinder tasks. Typical timelines by boiler type Durations depend on boiler type and the amount of pipework or cylinder work involved. Use these typical on-site times to plan time off and arrange access for the engineer. The examples below reflect common scenarios rather than bespoke cases. Combi boilers: like-for-like combi swap Expect around 4–6 hours on site for a like-for-like combi swap and allow a full day for minor snags. The engineer will isolate and drain the system, remove the old unit, mount and connect the new boiler to gas, water and electrics, then commission and demonstrate the controls. Because pipework and the flue usually remain in place for a straight swap, disruption is generally limited for homeowners. System boilers: replacing a boiler with a hot-water cylinder Replacing a system boiler and working with a hot-water cylinder typically takes 2–4 days, especially when routing extra pipework or lifting floorboards is required. If the boiler is being relocated or a new flue is fitted the job commonly increases to 3–4 days because of structural work, extra pipe runs and extended commissioning. Making good and final testing are important finishing steps that add essential time at the end of the project. Regular (heat-only) boilers and complex upgrades Heat-only swaps usually sit between the two and typically take 1–3 days, depending on vented supplies, tank work and any cylinder changes. Fuel swaps, major flue reroutes or required system cleaning such as a powerflush will extend the schedule and should be planned at survey. The survey will confirm the likely duration for these more complex jobs. Installation day: step-by-step and how long each phase takes Installation day normally runs in three phases: preparation and removal, fitting and connections, and commissioning with handover. Preparation starts with isolating gas and electrics and draining the system, and draining usually takes around 30–60 minutes. Removing the old boiler and making pipework safe can take from one hour to several hours depending on access and the condition of valves and fittings. The fitting phase covers mounting the new boiler, aligning and joining pipework, and installing the flue and brackets. On a like-for-like combi swap these tasks combine with removal work to complete the job in roughly 4–6 hours, with most labour focused on pipe runs and connections. Flue work varies: rear or side terminals are quick, while relocating a terminal through thick walls or to a higher elevation adds time and may push parts of the job to a second day. Final checks include refilling the system, purging radiators, pressure testing, commissioning controls and a customer walkthrough, which typically take 1–2 hours. A common schedule is morning removal and rough-in, followed by afternoon final connections, tests and a short demonstration so you know how to operate the boiler. Allow for contingencies: corroded valves, old copper or thermostat wiring faults can add time or require extra parts, so book a full day to avoid rushed work. Extra work and add-ons: how they change the timetable Optional tasks and upgrades can turn a standard half-day swap into a full day or a multi-day project. Planning add-ons at quote stage avoids repeat visits and unexpected disruption. Below are common extras and the time they typically add. A powerflush typically adds about 5–8 hours for an average three-bedroom home and may require a separate day if the system is heavily contaminated. Powerflushing removes sludge that can damage a new boiler, so it is often recommended at the time of replacement. Signs that a flush is needed include cold spots on radiators, noisy pumps, slow heat-up times and discoloured water; the survey will confirm the likely duration. Relocating a flue or moving the boiler position can add several hours or a full extra day depending on access and how many walls need cutting. New flue routes may require structural checks, builder work and extra ventilation or pipework, which increase the overall installation time. Confirm these details during the survey so lead times and any permissions are factored into the schedule. Replacing radiators typically takes 1–3 hours per unit, depending on access and whether the system must be drained between changes. Upgrading to smart controls, adding zones or fitting thermostatic radiator valves usually adds configuration time but can often be completed on the same day. Combining these upgrades with the boiler swap prevents extra visits and reduces overall disruption. After you choose any add-ons, plan how they affect the overall schedule and cost so there are no surprises. Agreeing extra work at quote stage helps the installer bring correct parts and reduces the chance of follow-up visits. The next section explains common causes of delay and how to keep your system running while the work is done. Delays, red flags and how to minimise downtime Delays most often come from a few predictable sources: missing parts, undisclosed asbestos, corroded valves,
How to Increase Pressure on Worcester Boiler Without Key
Is your home getting colder while a blue light flashes ominously on the boiler casing? There are few things more stressful than realizing your heating has stopped because of a boiler lockout due to low pressure, especially when you cannot find the specific white plastic key usually required to fix it. This frantic search often begins when the display flashes the Worcester boiler EA fault code troubleshooting sequence, leaving homeowners shivering and assuming they need a professional repair. Fortunately, common plumbing practices show that many systems bypass this proprietary key entirely. Instead of the internal mechanism, your setup likely uses an external filling loop—a flexible silver hose located just underneath the unit. Think of this component as a simple bridge connecting your mains cold water to the heating system, allowing you to top up the water levels without needing any branded tools at all. Restoring your Worcester boiler pressure is simply a matter of identifying this loop and managing the flow until the gauge hits the “green zone.” You can get the needle back to a stable 1.5 bar and restore your hot water within minutes. Why Your Worcester Boiler Pressure is at Zero And What the Gauge is Telling You Before touching any valves, take a close look at the circular dial on the front of your unit. This gauge measures internal resistance using a unit called “bar,” which functions much like the air pressure in your car tyres—too little, and the system can’t circulate heat; too much, and it strains the components. Most Worcester Bosch boilers are designed to operate safely only when there is enough water to move the needle out of the zero zone. Modern heaters include a safety mechanism called “lockout” to prevent expensive damage. If the sensor detects the pressure is too low, it cuts the ignition to stop the internal components from burning out dry, often resulting in common Worcester boiler problems like a flashing blue light. You can diagnose the status of your system by checking these zones: Don’t be alarmed if you notice a boiler pressure rise while the heating is running; hot water expands and takes up more space, temporarily pushing the needle higher. However, a gauge resting at zero when the pipes are cold means the system needs a top-up. Since the internal filling key is missing, we need to identify the standard plumbing part that bypasses that requirement entirely. Spotting the Secret External Filling Loop: No Key Required While the white plastic key is the “official” tool for specific Worcester models, many professional installers fit a universal backup system during the initial setup to make future maintenance easier. This alternative method uses a standard plumbing part located outside the boiler casing, meaning you can bypass the proprietary key entirely. Often, this component is tucked away inside the utility cupboard or situated directly below the white metal box of the boiler itself. Scan the pipework underneath your unit for a flexible, silver pipe that looks distinct from the rigid copper pipes around it. This part, technically known as an external braided hose connection, acts as a temporary bridge between your home’s main water supply and the heating system. When locating the filling loop on a Worcester boiler, use this checklist to confirm you have found the right component: Safety is the priority before you touch any valves. Reach out and gently twist the metal nuts at both ends of the silver hose to ensure they are hand-tight; if they are loose, water will spray into the room rather than into the boiler. Once you have confirmed the hose is secure and the connections are dry, you are ready to repressurise the system without triggering the safety valve. The Quarter-Turn Technique: Safely Increasing Pressure in 3 Steps Controlling the flow of water requires a gentle touch rather than brute force. Most external loops feature two small valves—one at each end of the silver hose—which must both be opened to allow mains water into the heating circuit. Position yourself so you can clearly see the pressure gauge, then locate the handle on the valve connected to the mains water pipe. If the handle is perpendicular (forming a ‘T’ shape) to the pipe, it is closed; slowly rotating it a quarter-turn until it aligns parallel with the pipe prepares the system for filling. Once the supply side is open, you will use the second valve to control the actual flow rate. Slowly turn this handle while keeping your eyes locked on the boiler’s pressure gauge, stopping the moment you hear the distinct hiss of water rushing through the hose. This sound confirms water is successfully entering the system, but patience is vital here. Rushing this step can cause the needle to shoot past the target zone into the red, triggering the pressure relief valve, so keep the flow steady and moderate. Allow the pressure to build gradually until the gauge needle climbs into the green sector, typically resting between 1 and 1.5 bar. Immediately rotate both valve handles back to their original closed position—perpendicular to the pipe—to seal the system off from the mains supply. Double-check that the hissing sound has completely stopped to ensure you haven’t left a valve slightly ajar, which would continue to increase boiler pressure dangerously while you walk away. While this external hose method is standard for many setups, modern Worcester Greenstar models often feature a built-in mechanism that requires no external piping at all. If you cannot find a silver hose, your unit likely utilizes the internal method known as operating integrated filling link. This newer design removes the guesswork of external plumbing, allowing for repressurising heating system via blue levers located securely underneath the boiler chassis. The Keyless Greenstar Alternative: Operating the Integrated Blue Levers Owners of newer models, specifically the “Greenstar i” or “Compact” series, benefit from a cleaner design that eliminates the external hose entirely. Instead of hunting for loose pipes, look underneath the boiler casing for a distinct blue plastic lever.
Is a Leaking Condensate Pipe Dangerous?
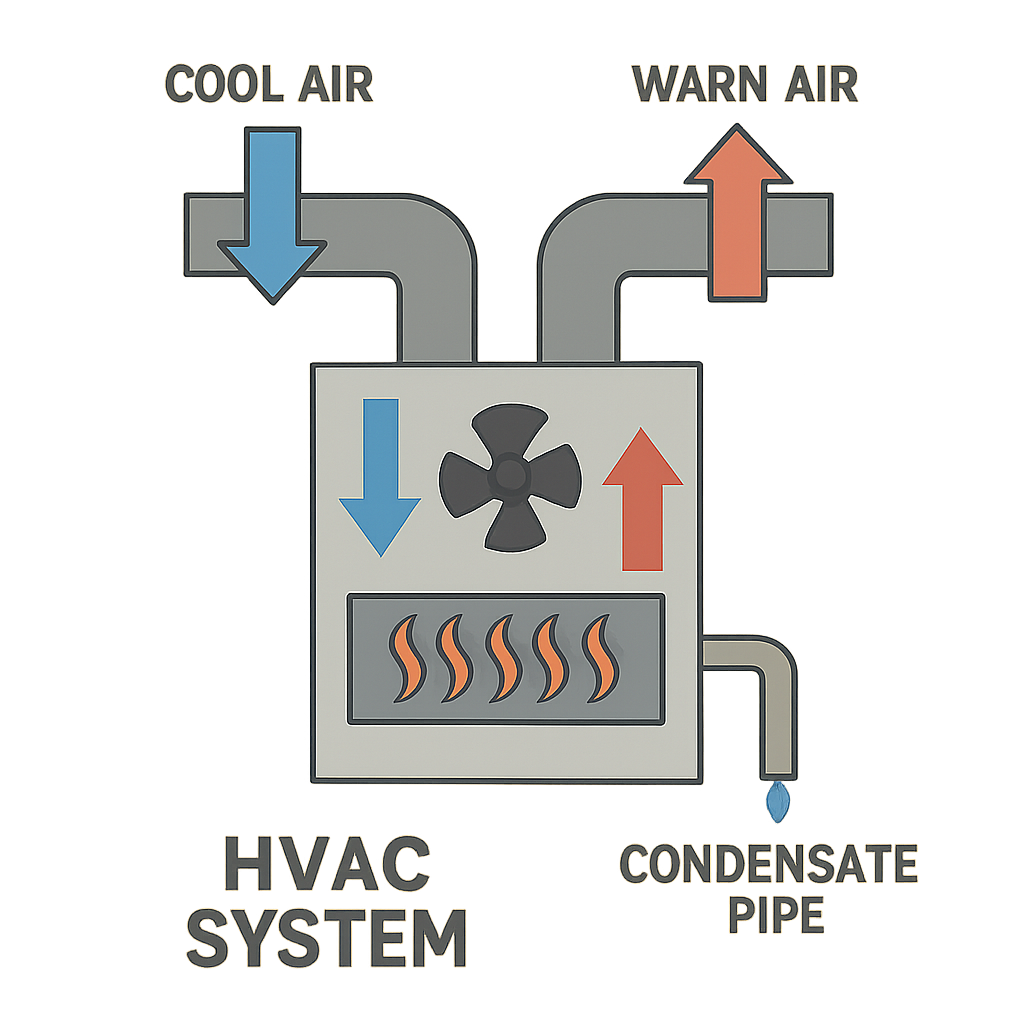
A leaking condensate pipe might seem minor, but it can lead to serious issues. These pipes are part of your HVAC system, designed to drain excess moisture. When they leak, they pose risks of water damage to your home. Moisture damage from leaks can cause mould growth, which is a health hazard. Mould can spread quickly, affecting air quality and causing respiratory issues. Water damage can also weaken your home’s structure over time. This can lead to costly repairs and even compromise the safety of your home. Increased humidity from leaks can damage belongings and create discomfort. It’s crucial to address leaks promptly to prevent these problems. Regular maintenance of your HVAC system can help prevent leaks. Understanding the signs of a leaking condensate pipe is key to protecting your home. What is a Condensate Pipe and How Does it Work? A condensate pipe is an integral component of HVAC systems. Its primary role is to channel and expel excess moisture generated during system operation. This moisture forms when your HVAC system cools or dehumidifies air. This pipe typically runs from your HVAC system to the outside of your home. It prevents water accumulation, which could lead to damage. Without this pipe, the moisture would have nowhere to go, increasing water damage risks. The process works through condensation. As warm air passes over cold evaporator coils, it cools down and moisture condenses. This water then drains away via the condensate pipe. Key functions of the condensate pipe include: Ensuring the condensate pipe is functional can help keep your HVAC system efficient. Proper operation of this pipe prevents both moisture and structural damage. Common Causes of Condensate Pipe Leaks Leaks in condensate pipes can arise from several common issues. One prevalent cause is blockages, often due to debris or algae build-up inside the pipe. These blockages prevent water from draining properly, leading to leaks. Corrosion is another factor that contributes to leaks in condensate pipes. Over time, pipes can degrade, resulting in cracks or holes through which water can escape. Improper pipe installation is also a frequent culprit. If the pipe is not correctly aligned or secured, leaks may occur. Ensuring a correct slope is crucial for effective drainage. Physical damage to the pipe, perhaps from external forces or pressure, can cause leakage as well. Here are some typical causes of leaks: Identifying these issues early can save homeowners from extensive repairs. Regular inspection of the condensate pipe can help in detecting potential problems before they escalate. Signs and Symptoms of a Leaking Condensate Pipe Recognising the signs of a leaking condensate pipe is key to preventing severe damage. Water stains appearing on walls or ceilings can indicate a leak. These stains are often discoloured patches caused by the water seepage. Dampness around the HVAC unit is another common symptom. If the area feels unusually moist, it may indicate a leak. Unpleasant odours are a subtle yet significant sign. Stagnant water from leaks can result in musty smells in the home. Listen for unusual sounds such as dripping or gurgling noises near the HVAC system. These can suggest water is not flowing properly. Here’s a quick checklist for spotting leaks: Regular checks can help catch these indicators early and prevent costly repairs. Is a Leaking Condensate Pipe Dangerous? Yes, a leaking condensate pipe can be dangerous. It poses several risks to your home’s safety and integrity. Water seeping from a leak can slowly cause structural damage. Over time, wooden components may warp or rot. Metal parts can corrode, leading to further issues. Additionally, leaks can increase humidity levels indoors. This creates an uncomfortable living environment and potentially damages belongings. Moisture from leaks encourages mould growth. Mould not only harms surfaces but can also compromise air quality, posing health threats. Electrical systems might be at risk too. Water damage can lead to short circuits, creating fire hazards. Here are the dangers associated with leaking pipes: Leaks can also result in financial strain. Increased utility bills due to inefficient HVAC operation is common. Repairing extensive water damage can be costly if not addressed promptly. Financial repercussions of leaks include: By addressing condensate pipe leaks early, you can safeguard your home and health whilst saving money in the long run. Water Damage Risks from Leaking Condensate Pipes Leaking condensate pipes may lead to severe water damage risks in homes. Water can seep into floors, walls, and ceilings. Over time, this can weaken structural components, leading to costly repairs. Another risk involves the home’s interior finishes. Wallpaper and paint may begin to peel or bubble. This not only affects aesthetics but also decreases property value. Additionally, water damage can lead to the growth of mould and mildew. These fungi thrive in damp environments and can spread quickly. Their presence can cause health problems and further structural damage. Furniture and personal belongings are also at risk. Water can stain, warp, or ruin items near the source of a leak. Damage can extend to electronics and appliances, potentially leading to malfunctions. Key water damage risks include: Early detection and repair of leaks are crucial. Addressing issues promptly can mitigate the extent of water damage. Maintaining the health and safety of your home depends on proactive measures. Moisture Damage and Its Impact on Your Home Moisture damage occurs when water vapour accumulates in areas it shouldn’t. Leaking condensate pipes contribute significantly to this issue. Prolonged exposure to excess moisture can lead to pervasive damage in homes. One major impact is the deterioration of building materials. Wood, plasterboard, and insulation can absorb moisture and degrade. This can compromise the home’s structural integrity over time. High humidity levels, facilitated by leaks, create a welcoming environment for pests. Insects such as termites thrive in moist conditions. Their presence can result in additional damage and expenses. Moisture can also cause finishes and fixtures to fade or warp. This affects the visual appeal of a space and requires repair or replacement. Preserving home aesthetics hinges on effective moisture control. Key impacts of
How to Release Push Fit Plumbing Fittings
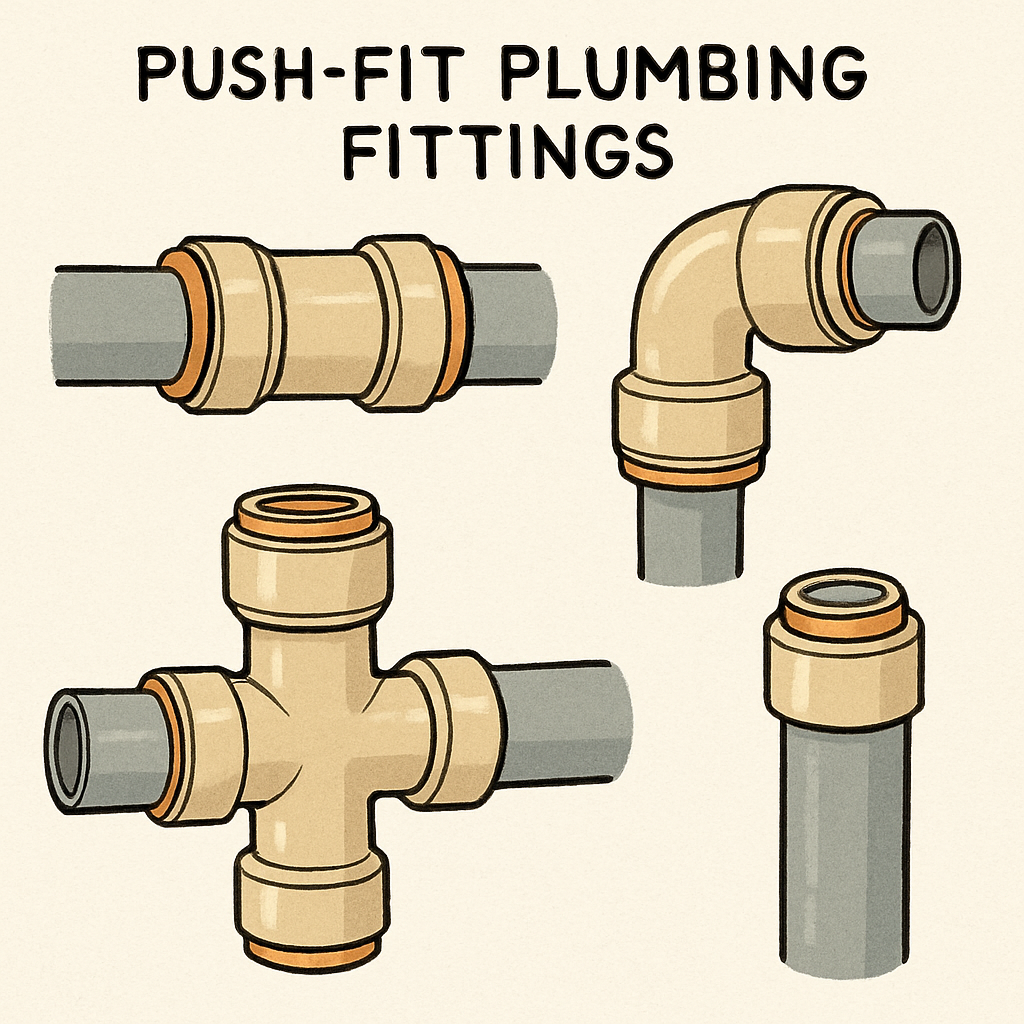
Push fit plumbing fittings are a game-changer for DIY enthusiasts and homeowners. They offer a quick and easy way to connect pipes without the need for soldering. These fittings are popular for their simplicity and efficiency. They are used in both copper and plastic plumbing systems. Understanding how to release push fit plumbing fittings is essential for any plumbing project. It ensures you can make adjustments or repairs when needed. This guide will walk you through the process step-by-step. You’ll learn about the tools required and the techniques involved. Whether you’re a beginner or have some experience, this guide will help you master the task. With the right knowledge, you can handle plumbing tasks with confidence. Let’s dive into the world of push fit plumbing fittings and discover how to release them effectively. What Are Push Fit Plumbing Fittings? Push fit plumbing fittings are essential components used to join pipes quickly and efficiently. They eliminate the need for welding or adhesives, making them ideal for both novice and experienced plumbers. These fittings are compatible with various plumbing materials, including copper, PEX, and CPVC. This versatility allows them to be used across different plumbing systems. Push fit fittings are popular due to several advantages: These fittings use an O-ring and a gripping mechanism to create a watertight seal. The O-ring is crucial as it prevents leaks and ensures durability in various water systems. Their user-friendly design makes them perfect for tight spaces or quick fixes. Whether you need a temporary repair or a permanent solution, push fit fittings are a reliable choice. They simplify complex plumbing tasks, bringing convenience and efficiency to your home projects. How Push Fit Fittings Work: The Basics Understanding the mechanics of push fit fittings helps ensure a secure installation. These fittings create a seal using a combination of an O-ring and a gripping mechanism. This design ensures a leak-proof connection in both water and gas applications. The process begins when a pipe is inserted into the fitting. The pipe pushes past a series of metal spurs inside the fitting. This action locks the pipe in place while the O-ring creates a watertight seal. Key features of push fit fittings include: These features make push fit fittings a popular choice for both new installations and repairs. Their user-friendly design eliminates the need for bulky tools or extensive training. This ease of use makes them especially appealing for quick fixes and DIY projects. The versatility of push fit fittings enables efficient connections while maintaining reliability and durability. Tools and Accessories Needed to Release Push Fit Fittings Releasing push fit fittings requires specific tools to ensure precision and safety. The most essential tool is a disconnect clip or tongs designed for the fittings. This tool compresses the release collar, allowing the fitting to detach from the pipe with ease. Before starting the process, it’s important to gather additional plumbing accessories. You may need a pipe cutter for trimming, as well as a deburring tool to smooth pipe edges after removal. These tools help prepare the fitting and pipe for either reattachment or new installations. Here is a list of common tools and accessories: Having these tools readily available simplifies the process. This readiness not only ensures a hassle-free experience but also enhances the overall quality of your plumbing task. Proper tools are crucial for effective and safe removal of push fit fittings. Step-by-Step Guide: How to Release Push Fit Plumbing Fittings Releasing push fit plumbing fittings is a straightforward task when done correctly. The key is to follow a systematic approach. Ensuring that you have the right tools and a clear plan is essential. Firstly, make sure to turn off the water supply. This is crucial to prevent leaks and flooding. Always double-check that the water is off before proceeding. Use the disconnect clip or tongs on the fitting’s release collar. These tools are designed to apply even pressure around the collar. Ensure the tool is properly positioned for effective compression. Gently push the tool against the release collar while pulling the pipe. The pipe should slide out effortlessly when done correctly. It’s important not to force it, as this could damage both the fitting and the pipe. To check for leaks, inspect the area once the pipe is removed. Use a cloth to wipe away any moisture. Be thorough, as this ensures no future water damage. Before reusing the fitting, inspect it for signs of wear or damage. Look for any visible cracks or debris. If the fitting looks compromised, replace it immediately. For guidance, here are the essential steps summarised: If reusing the fitting, ensure that the pipe ends are smooth and clean. Use a deburring tool if necessary, preparing them for a reinstallation. This step guarantees a watertight seal when reattached. Taking your time and following each step carefully is essential. It ensures a successful fitting release without damage. With practice, releasing push fit fittings becomes a quick and simple task. Tips for Removing Push Fit Copper Plumbing Fittings When working with push fit copper plumbing fittings, extra care is required. Copper is a durable yet malleable material. Handling it gently prevents unnecessary damage. Use a proper disconnect tool designed for copper fittings. This tool ensures a smooth removal process without damaging the pipe. It is essential for maintaining the integrity of copper pipes. Before removal, prepare the area by cleaning the pipe and fitting. Any debris can hinder the release process. A clean working environment contributes to a more successful outcome. Here are some helpful tips: Remember, patience is crucial when dealing with metal pipes. Carefully executing each step ensures a quick and successful removal process. Following these tips makes handling copper fittings less daunting. Troubleshooting: Common Problems and Solutions Facing issues while removing push fit plumbing fittings is not uncommon. Input (British English): These problems usually arise from incorrect techniques or suboptimal conditions. Understanding these challenges helps in finding effective solutions. A frequent issue is leakage after reinstallation. This often occurs when the